author : Mohit Malik
Survey – Form
This is an application to create a survey and fill up the survey.
Actors of the application –
1. Admin – creator of survey form.
2. Users – fill the survey forms created by admin.
Functional Requirements –
Admin -
1. Admin should be able to login the application with a given User Id and Password.
2. Admin should be able to add question in a user friendly survey form.
3. After successfully submitting the form Admin should get a URL of the survey which can be shared to user.
4. Admin should be able to view all of his previous questions in a table form.
5. Admin should be able to view result of a single survey in a graph.
User –
1. User should be able to login through his/her Gmail through Open Auth Service.
2. User should be able to access the survey question through the URL shared by admin.
3. User should be able to fill & submit the survey after successful login.
4. User should be able to view the result of that particular survey he/she filled after submitting.
For the above functionalities we require 7 pages –
Admin pages–
1. Login (by User Id & Password)
2. Add a question
3. View all questions
4. View result of a single survey
User pages –
1. Login (by Gmail)
2. View & Submit the Survey
3. View result of that Survey
External Dependencies –
1. Firebase Firestore – which will store data of our survey forms
Link - https://console.firebase.google.com
Documentation link for web integration- https://firebase.google.com/docs/web/setup?authuser=0&hl=en
Documentation link for Firestore - https://firebase.google.com/docs/firestore/manage-data/add-data
2. Firebase Google Auth Service – which will help us to identify the user uniquely on the basis of their Gmail.
Link - https://firebase.google.com/docs/auth/web/google-signin
3. Data tables – this is used to show the information of all the questions to the admin on single page in a user friendly way. Admin can sort, search, go to next and previous page and also set how many items he/she wants to view on a single page.
Link - https://datatables.net/
Example for more help - https://www.geeksforgeeks.org/how-to-load-data-from-javascript-array-using-jquery-datatables-plugin/
4. Jchart – this is used to show the result of a single survey form in a bar graph form.
Link - https://www.chartjs.org/
Example for more help - https://www.w3schools.com/js/tryit.asp?filename=tryai_chartjs_bars_colors_more
5. Sweet Alert – this is an external js library which provides you better and stylish popup windows it is optional.
Add this link in script tag in bottom of the body tag (just before closing of body tag)
Link - https://sweetalert2.github.io/
1. Let Us start with Admin Login page –
Step 1 – Create an HTML page with 2 input fields and a button. Give appropriate Id’s to these input fields (i.e., user_id & password) and add a function in “onClick” event of button (like – onClick = “login()”).
Step 2 – style the page with CSS styles of your choice, don’t forget to link the CSS file in html head tag if you are creating separate CSS file.
Step 3 – create & link a javascript file which will be having admin login functionality.
Step 4 – create a function with the same name you mentioned in onClick of button (i.e., login), in this function retrieve the text of input fields (both user id & password) by DOM element query.
Example – var user_id = document.getElementById(‘id of the element you have given in html’).value;
By this code line we can get and use the value filled by user in that particular field.
In login function match the user id & password with the correct user id & password.
This correct user id & password is written in javascript hard coded. So, if admin wants to login, then he/she can only login with the user id & password provided to him by us. He/she can’t change the password.
If the credentials (user id & password) are correct then use a popup (Sweet Alert) of your choice which will display a message “Login Successful ” and redirect the admin to add question page.
Code for redirecting from one page to another page, use location.href –
location.href = "./add_question.html";
through this the admin will be redirected from login page to add question page, make sure admin will only redirect if the credentials are correct.
If the credentials are wrong display a popup which will display a message “Invalid Credentials” to the admin.
2. Next, we have Add question in survey –
Step 1 – Create a HTML page with 6 input fields and 2 buttons. 1 input field for type of question, 1 input field for question description rest 4 input fields for 4 options of the question. One button is for adding the question in the database and another button for viewing all the question in database. Also give appropriate ids to these fields and buttons so that we can retrieve their values and call function on click on the button.
Step 2 - style the page with CSS styles of your choice, don’t forget to link the CSS file in html head tag if you are creating separate CSS file.
Step 3 - create & link a javascript file which will be having add question, view all question functionality.
Step 4 – Create a function in Javascript and map it with on click of add question button (same as you did at the time of login, mention it in onClick event of button).
Step 4.1 – retrieve all the 6 input values of the html elements in this function, if any of the field is empty display a popup window with a message “All fields are necessary” else if all the fields are not empty then call the firebase add query for adding the question in database.
Step 4.2 – Integrate firebase in your app because we have to add our questions data in firebase Firestore database.
From here we are going to discuss the steps to integrate and use firebase in our application –
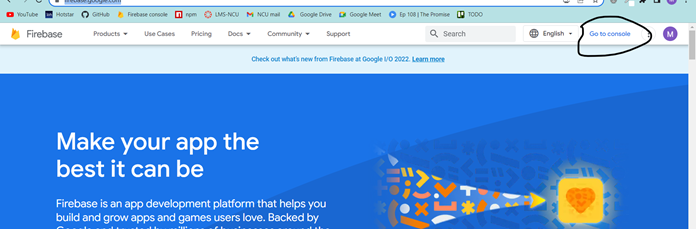
Step 4.2.1 – Create and account on Firebase- https://firebase.google.com/, you can ignore this step if you already have an account on firebase.
Step 4.2.2 – After creating account press on Go to console on top right of the page.
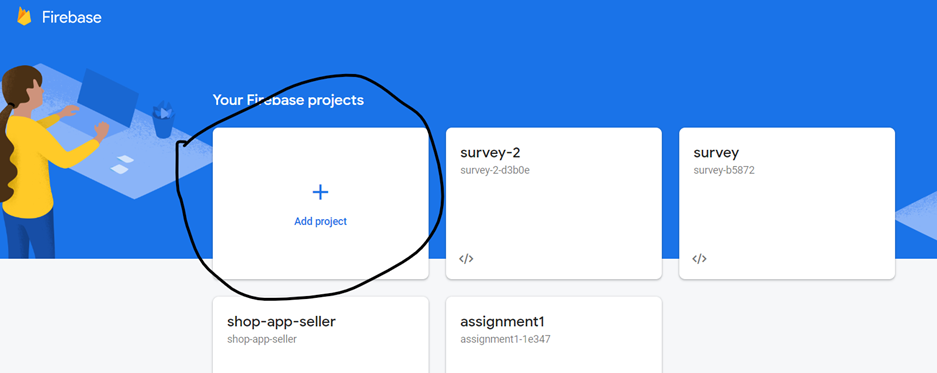
Step 4.2.3 – Click on Add Project.
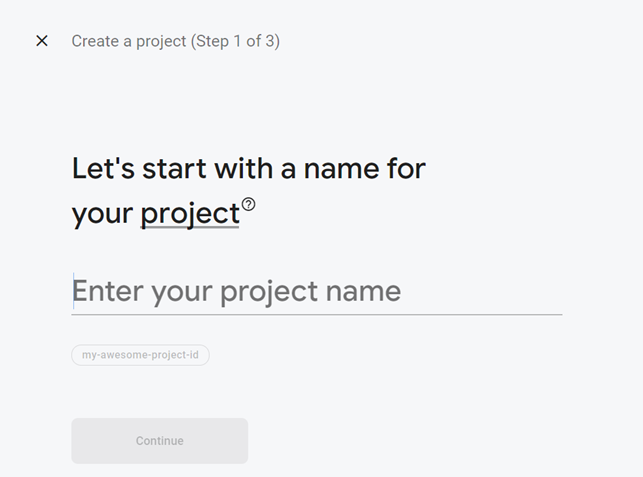
Step 4.2.4 – now you have to follow the steps given by firebase console as it is –
Firstly, give a name to your project and then click on continue–
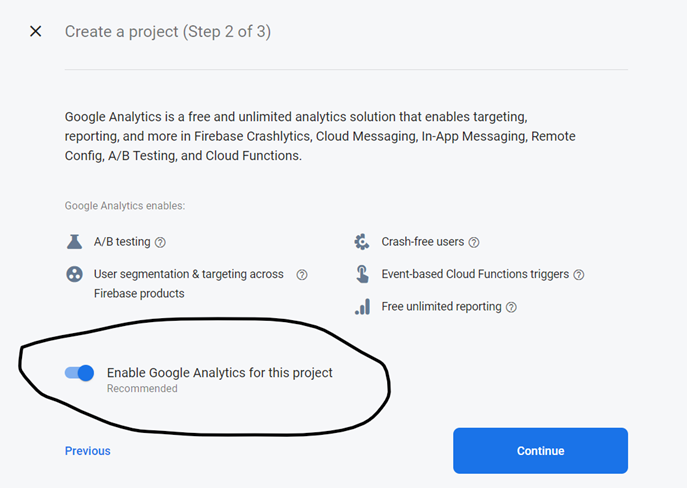
Secondly, it is your choice to enable the google analytics for your project and click on create project.
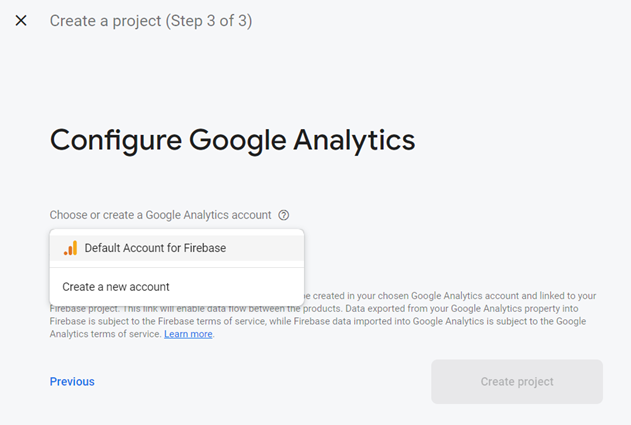
At last, select the account (account of firebase that you have created) for this project then click on continue.
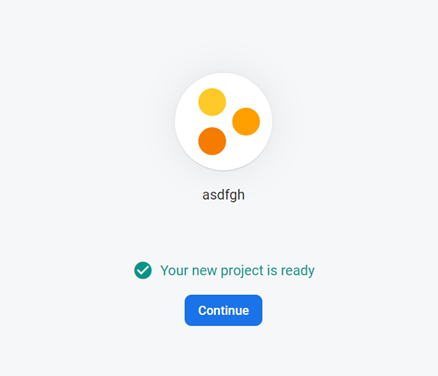
It will take few moments for creating the project and after that click on continue –
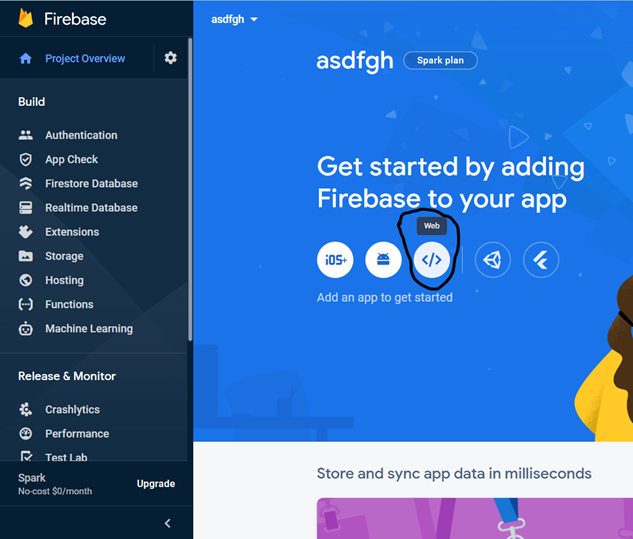
You will be redirected to the dashboard of your application from here you can use and implement the firebase features in your application.
As we are currently working on web click on web icon –
Give a name to your web app –
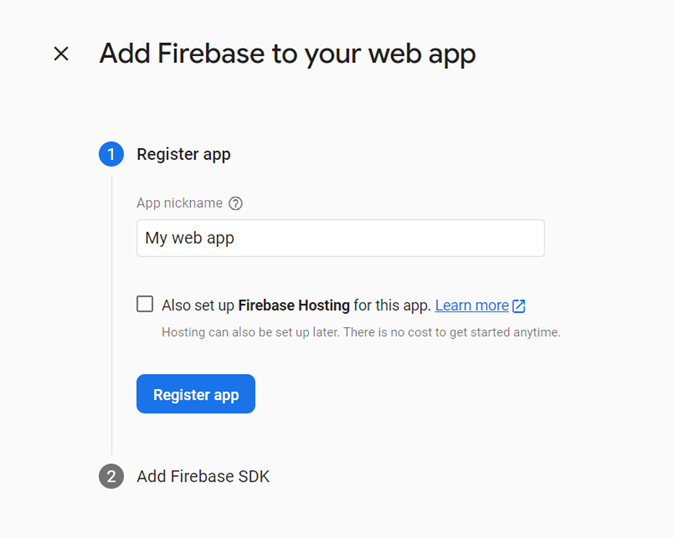
You can also enable firebase hosting or you can use your own hosting platform.
Then click on of register app.
Then you will get Firebase SDK which is configured to your project. Choose “Use a <script> tag” if you are working on Vanilla JS or normal HTML, CSS, JavaScript project, you can use “Use npm” in case you are working on some framework like React JS.
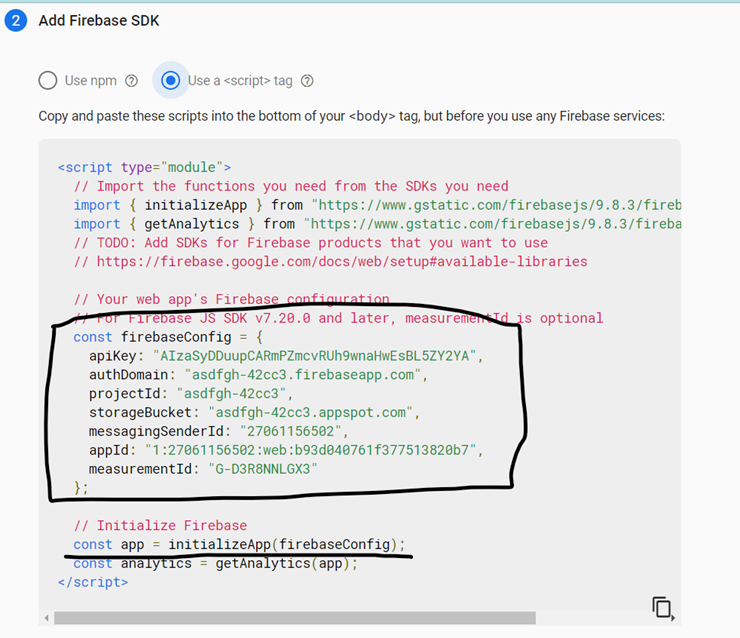
The Firebase Config object in this script is most important part that you have to use in your application in order to link the firebase web project with your web project. And initializeApp line is for initializing the firebase application in your script. Don’t worry if you don’t understand where to use this code just copy your firebase config object for now, we will discuss the implementation of firebase after few steps in javascript. Then click on continue to console.
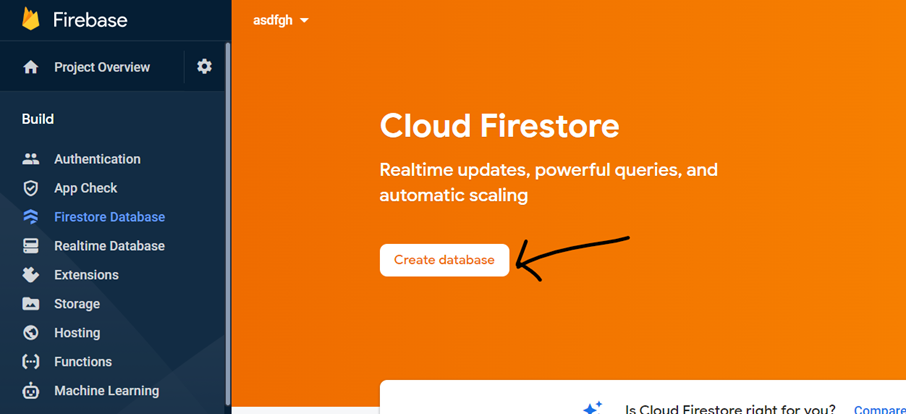
Step 4.2.5 - First of all we need Firebase Firestore to be activated for our application, Firestore is latest storage mechanism provided by firebase. It is similar to MongoDB which is a NoSQL database. Click on Firestore Database which is present on the side bar of console of your project.
Then click on Create Database –
It’s your choice to select the production mode or testing mode, if you are not building this application for some production or live purpose then I will recommend to use test mode. (Test mode is accessible to all*)
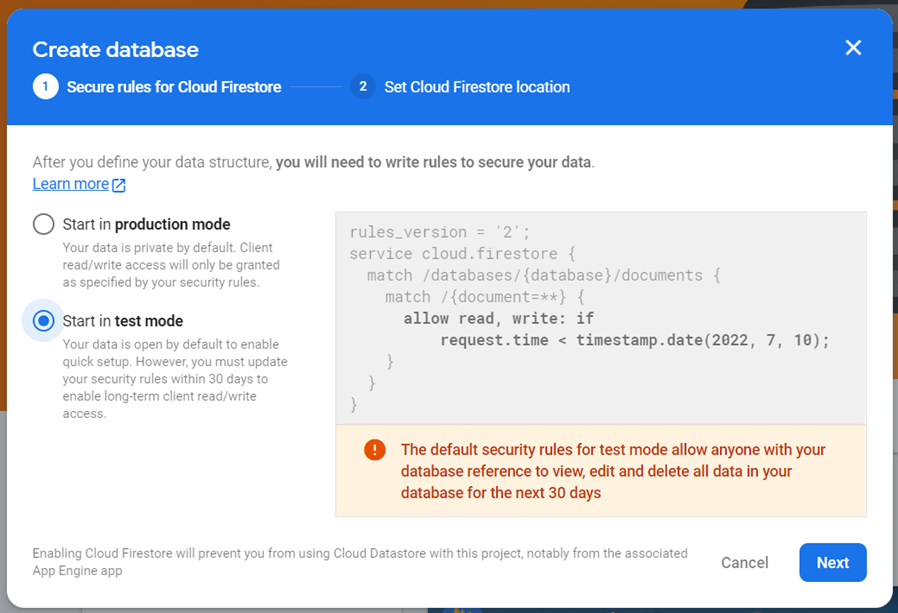
Select Cloud Firestore location which is nearest to you so that the efficiency in calling the API will be increased.
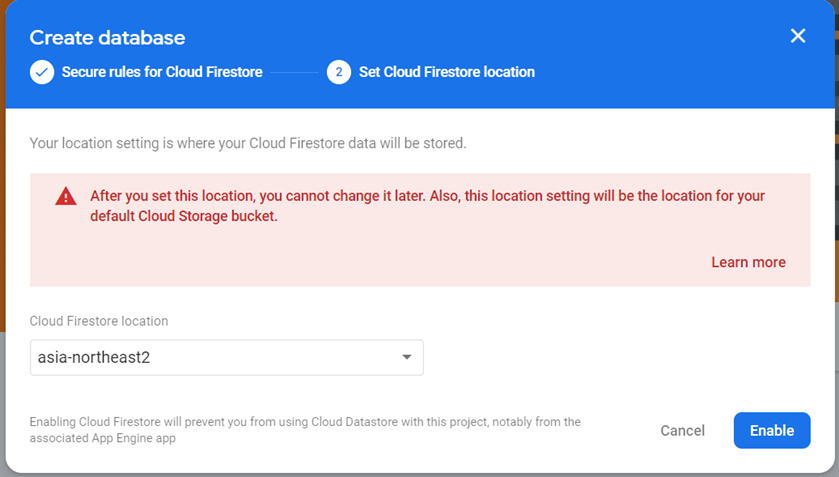
Then click on enable, this might take few moments.
The database will empty in starting. Your next step is to click on rules and edit it –
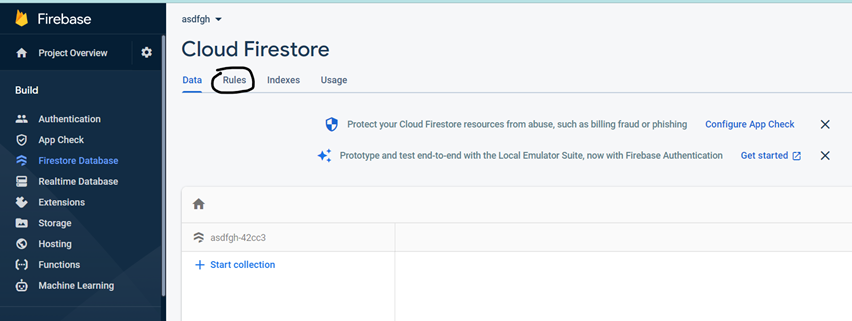
If you look carefully the default rules have an If condition for read write operations in database –
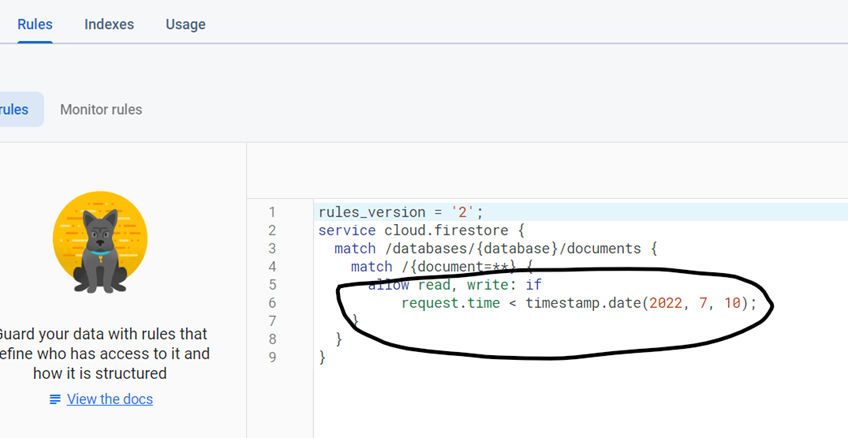
We have to edit it so we can easily perform read & write operations. Remove the line “request.time < timestamp.date(2022, 7, 10);” and just write true in front of If. By this anyone can perform read & write operation in your database from anywhere. This is ok if you are not developing for production purpose else you should use some condition, like only authenticated users should be able to perform read & write operations in my database.
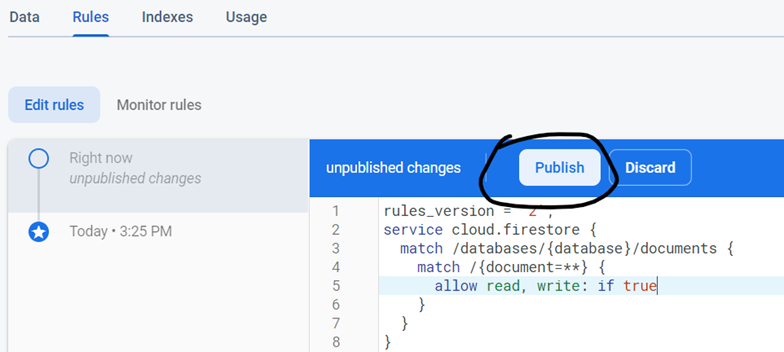
After changing the rules click on publish to save the rules–
Now the last step to integrate the Firebase into your application –
Step 4.2.6 - Create a file firebase.js (because this file will be containing your firebase config details)
Remember the firebase config object that you have received from firebase for initializing your application, we are going to use it in this file to initialize the firebase application.

Firebase.initializeApp(firebaseConfig) this command is to initialize the firebase application in your script, and then from firebase.firestore() our firebase application provides us an instance of the Firestore database configured for our application. We are storing it in db variable and exporting it. We are exporting it so that in our whole application we just have to import this file if we want to access the Firestore instance.
Firebase Implementation Complete!
Step 4.3 – now we are ready to use the Firestore database to store our question survey data.
Link the following firebase JS scripts in your add question html head tag under script:src –
<script src="https://www.gstatic.com/firebasejs/8.10.1/firebase-app.js"></script>
<script src="https://www.gstatic.com/firebasejs/8.10.1/firebase-firestore.js"></script>
Remember the step 4.1 in which we retrieved all the data of 6 input fields, if it is successful then we are going to add the data into the database,
Step 4.3.1 – import the database into your javascript file by this code “ import {db} from ‘./firebase.js’ ”
By this statement we have imported the Firestore database instance into this file in db variable, we are using {} for destructuring the object because when we export something from a file it is exported in form of a object and that object contains our exported items. So, either we access the item by “.” operation or just destructure the exported object and get only those item(s) that we require.
Note – if you use import/export statement in any js file then it became a module and to use modules as a script we have to mention the type attribute in script tag in head tag of html file. Mention type=”module” for using a script which is a module.
If we don’t mention type in script then you might get an error like this –

As we imported the database instance in our add question js file so it became a module, so you have to mention the type module in script tag of this javascript in head tag html file –
<script type="module" src="./Assets/javascripts/view/makequestions.js"></script>
Now another small change if our js file is a module the it is not executed like a normal js file, in normal js files they get loaded after html loading is finished but in module, we have to use some extra code statements so that our js script will get loaded.
Create a new function bindEvents in which you will mention the code statements which will link the button onclick event to your old function of javascript which was retrieving the data from input filed and validating that the fields are empty or not. Like this –
import{db}from "../firebase.js";
window.addEventListener("load", bindEvents);
functionbindEvents() {
document.querySelector("#add").addEventListener("click", myFunction);}
functionmyFunction() {
So now windows.addEventListner will attach your function bindEvents with loading of the windows (window is nothing just a screen/page of your browser for simplicity you can refer window with your html page).
This means when the loading event of window is triggered then it will execute your bindEvents function.
Previously we just mentioned our function in onClick event of the button add question but as our js is a module now so we have to use this method for binding the onClick event of button with our function (here myFunction is the function in which validation is being done for input fields) remove the function from onClick event otherwise you might get an error like this after clicking on the button (although the functionality will work as you bind the onclick of the button in your js file in bindEvents function but onClick will try to find a function which is not accessible directly so it is preferred to remove it now from onClick of button in html )–

Step 4.3.2 – Create a local variable which is an object of a question –
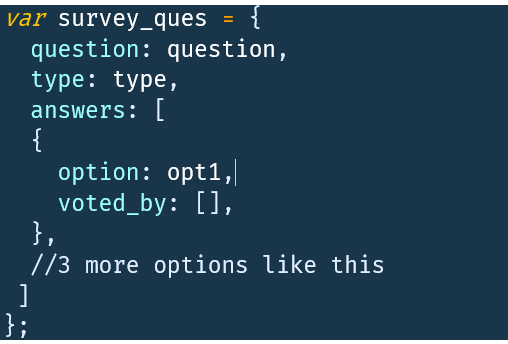
this survey_ques is an object which we will store in the database, it is similar to JSON.
Question is the question description retrieved from the corresponding input of question, type is the type of survey/question admin wants to give, make sure to add (string concatenation) a random number in the end of type so that each type can be unique and on user end we can display each survey by the help of this unique type.
Answers key holds an array of options, in this array we further have an object with 2 keys. One is option which contains the option description and another is an array which will contain the Gmail Id’s of the user who selected this particular option. Similarly, we have 3 more options object in this array of answers.
Step 4.5 - After storing all the data in form of an object (JSON form) we can add this object in Firebase Firestore database by the add an object query of Firestore–
db.collection(collection_name).add(your_object).then((document)=>/*object added successfully, do your stuff*/).catch((error)=>/*unsuccessful , you can display error popup*/);
let us discuss this query – >
db is the instance of Firestore database which we imported from the firebase.js, by the instance we should understand that we have the database to perform CRUD (CREATE READ UPDATE DELETE) operation easily.
.collection(collection_name)as we discussed previously that the Firestore database is similar to Mongo DB which also works on collections. If you don’t know anything about Mongo DB then you can assume that this collection is like a table of SQL. We can have multiple collections in a single database so we have to mention which collection we want to access by passing the collection name in collection().
the collection is group of our objects (documents), objects like the survey_ques object.
.add(object) is the create operation of the database, we can have other operations too like delete, update, etc. we have to pass our object in the .add() to add our object in the database.
if you have some knowledge of API calling or backend then you might know about promises which have .then and .catch for on success and on error of the query.
Because it will firstly send our object through the internet to firebase and store it in database and send us the response that the operation is successful or unsuccessful. But getting the response back will take time that’s why we have .then() and .catch() with add query. Both then and catch accepts a callback function to perform action accordingly.
If the response is successful then automatically the query will move into .then(), In then when we pass a callback function, we get the object as parameter saved in the database as it is. We can access the id of our object which is stored in database. When an object is saved in database a unique id is generated to identify this particular object uniquely. In this callback function we can perform action which is to be performed on successful status.
If the response is unsuccessful due to some error, then automatically the query will move into .catch(), in catch when we pass a callback function, we get the error as parameter. This is the error due to which our operation was unsuccessful, we can console the error and also show a popup message to admin by which he/she will know that the question is not added to the database due to some error.
Let us talk about what we need to do when the question is successfully added into the database –
1. All the input fields should be emptied so that admin can add another question without clearing all the fields manually. Your can do this by accessing those input fields and set their value as “” (empty string).
2. Secondly show a popup with successful message to popup.
3. And at last, we have to provide a URL to the admin. The functionality of this URL is that by hitting this URL anyone should be able to view the survey question that admin just added. For simplicity concatenate the base URL of showing a question to user with the type of this question.
Example –
"https://mohitleo03.github.io/survey-user.github.io/show_question.html?type="+type;
How this will help on user end to view the question will be discussed when we will build the show question page.
When you have created this URL show this to the admin so that he/she can share it with anyone he/she wants to.
Step 4.6 – Last functionality that should be added to this page is, we have to provide a button to admin after on click of this button admin will be redirected to another page on which admin can view a table containing data of all the question in the database.
3. Next let us build the view all questions page –
Step 1 – create a html file and create a table with some id in html body.
Step 2 – style the page with CSS styles of your choice, don’t forget to link the CSS file in html head tag if you are creating separate CSS file.
Step 3 - create & link a javascript file which will be having view all question functionality.
Step 4 – import db from firebase.js similarly you did while add question js file in step 4.3.1 and import statement can’t be used outside a module so this js will become a module, so mention type = “module” in head tag of the html file created in step 1 here.
After this we also have to load this js with load event of windows similarly we did this in add question js in step 4.3.1 map a function which will have all of our script code of this file like creating a Data Table code or fetching the data from cloud Firestore, etc.
Step 5 – go to Data Tables official site and pick the code snippet for creating a data table with a button in each row, this button will help to view result of that particular question/survey filled by users.
Step 5.1 – first of all import the js and CSS of the data tables as suggested by the official documentation of Data Tables –
<link rel="stylesheet" href="https://cdn.datatables.net/1.10.22/css/jquery.dataTables.min.css"/>
<script type="text/javascript" src="https://code.jquery.com/jquery-3.5.1.js"></script>
<script type="text/javascript" src="https://cdn.datatables.net/1.10.22/js/jquery.dataTables.min.js"></script>
Step 5.2 copy the code snippet for creating a data table with buttons in each row in the function ViewResult that we created in step 4 –
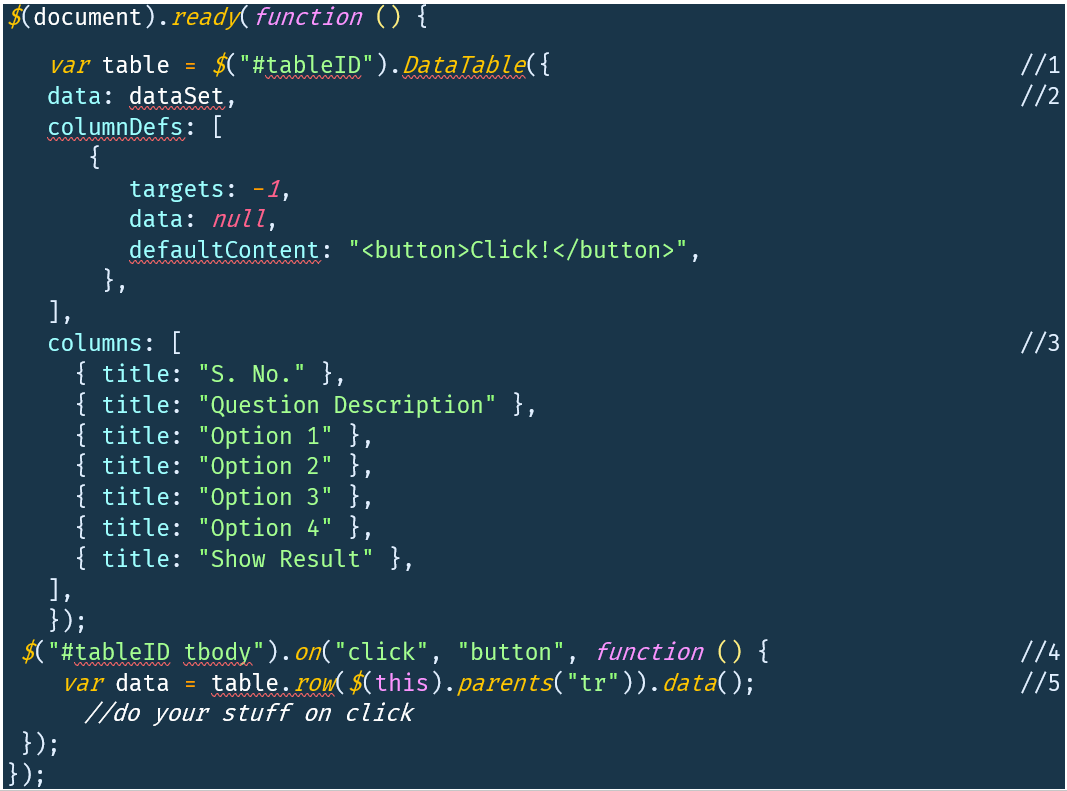
By the help of this you will get an empty table with few table heads.
Comment line 1 – here we are creating a variable of table through which we can access the table later on so that we can add the button and functionality on the on click of that button.
Comment line 2 – the key data accepts a dataset on the basis of which Data Table will create a table in HTML page. The data key accepts array which further have more arrays like –
data : [[1st row],[2ndrow],[3rd row],[4th row],…[last row]]
so, we have to create a variable which stores this type of information that can be given to data key in this Data Table code snippet.
Comment line 3 – columns key accepts an array of objects each object contains key value pair, this key value pair is just title of each column of our table. Make sure that your each sub array ()basically each row )of data set is having equal length as of columns array. Means if you have 6 data item in a row then you must have only 6 column titles else you will get error.
Comment line 4 – this is the code snippet by which we can add button functionality on the button of ach row in our table.
Comment line 5 – in this line we are getting the array of data of that specific row of which the button is clicked. By the table variable we accessed the table and rest is the Data Table code snippet.
Later on, we will add few more code lines in this code part so that our admin will be redirected to a new page on which he/she can view the result of a particular question/survey.
Step 6 – fetch the data from Firestore database so that admin can view data of all the questions.
Here we have to perform read operation from database so we have to look into Firebase Firestore documentation for data reading query –
db.collection(collection_name).get().then((querysnapshot)=>{}).catch((error)=>)
this query is also similar to the add (create) query, here we are using .get() in place of .add, and .then().catch() are exact same which will be called on successfully getting the data or if some error occurred.
If some error has occurred then the query will call .catch, In .catch simply show a popup window to the admin that some error has occurred.
If we receive the data successfully then we got the data and .then will be executed, in .then we have to define a callback and parameter of this callback is a querysnapshot object.
This querysnapshot object is containing all the documents (objects) of that collection in docs key. So, we have to iterate the querysnapshot and retrieve the data of each document. For this we can use a forEach.
Create a variable with empty array which will store the data which will be passed in the data key of Data Table code which we discussed in step 5.2, first of all decide what details of each question we are going to show to the admin –
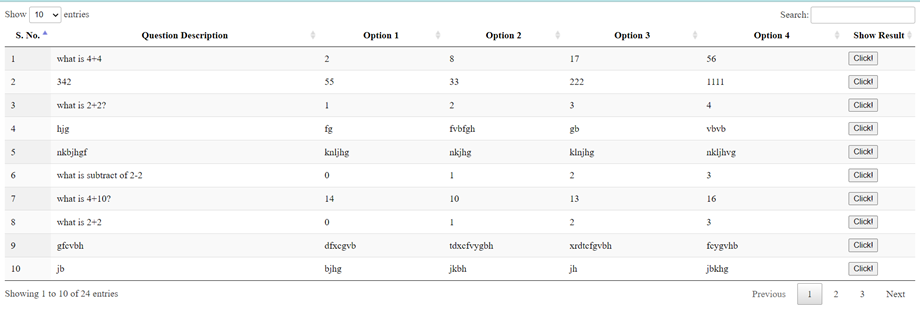
Serial Number, Question description, all 4 options, a button on click of that button admin will be redirected to another screen which will show a graph containing the result of that particular question/survey, the button creation part is already handled in previous steps by adding the required Data Table code and for Serial number maintain a count which will start from 1 and increase it with each iteration.
Now we have to retrieve the question description and all options from each object present in querysnapshot.
Each object in querysnapshot array is same as we send in to the database so for extracting the details, we have to use “.” Operator like object.question, object.answers… some more JS logic code to get the options from the array –
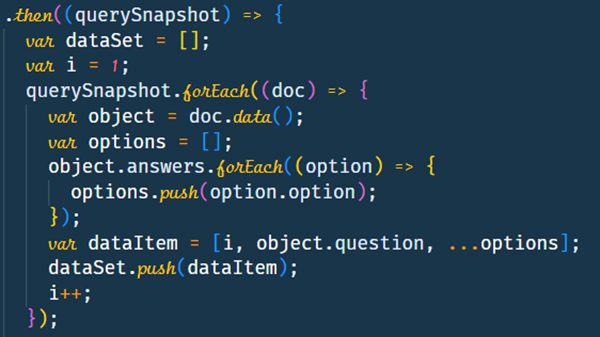
Then initialize a counter variable with value 1 for serial number,
Apply forEach on the querysnapshot object and then get the pure object from each doc by using .data() function through this we will get our object that we saved in database.
Now create an empty array which will store our options of each question, we are initializing it in forEach so when we will read another object this array will reinitialize and old options won’t be there.
Then use forEach to iterate the array of answers and push each option in the options array.
Then Create a variable (dataItem)which is an array and place all the items of a row in this array sequentially. We are creating the dataItem variable in forEach so that while reading next document it will be having no previously stored value in it.
And then push this dataItem in dataset array which is basically the whole table data in last increment the counter variable.
After this the Data Table code snippet should be placed, last this to be done is to add the functionality of on click of the button of the row.
For that come in the Data table code and in the place where we left in step 5.2, we have to extract the length of voted_by array of each option in array of answer in object which will be used in next screen as yValues, basically we are getting the number of votes for each option of a particular question/survey.
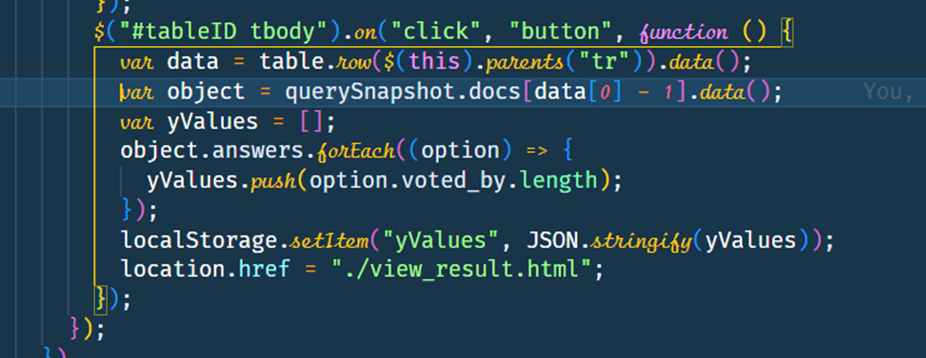
As we know the variable data in this code is containing all data items in form of an array of the table of which the button is clicked, so we can get the serial number by accessing the 0thelement of this data array, and from this serial number we can access the whole object (because we only displayed the question and options but now, we need the number of people filled the survey). Remember to decrease the 0thelement by 1 because serial number is starting from 1 and indexes start from 0, and if we want to get the whole object, we have to use the querysnapshot docs array, we have the index and we have to array containing original objects then we can simply get the required object, after getting the required object apply .data() function to get the object in pure object form.
After getting the object we have to find out that how many users choose a particular option, for this we are going to get the length of voted_by of each option object , for this we have to create a variables which will start from empty array, and get and push the length of voted_by array of each option in the answers array by applying forEach on answers array.
Then store this yValues array in local storage so that we can access in next page to show the graph, keep in mind that while storing the array we are converting it into string and storing it if we don’t perform this step then retrieving the array will be a hard task because local storage by default store the values given by us in form of string.
In last redirect to view result html page which will show a graph.
We will perform the same step later on in user end to show result when we have to get the number of users who filled the survey for each option.
Output Sample -
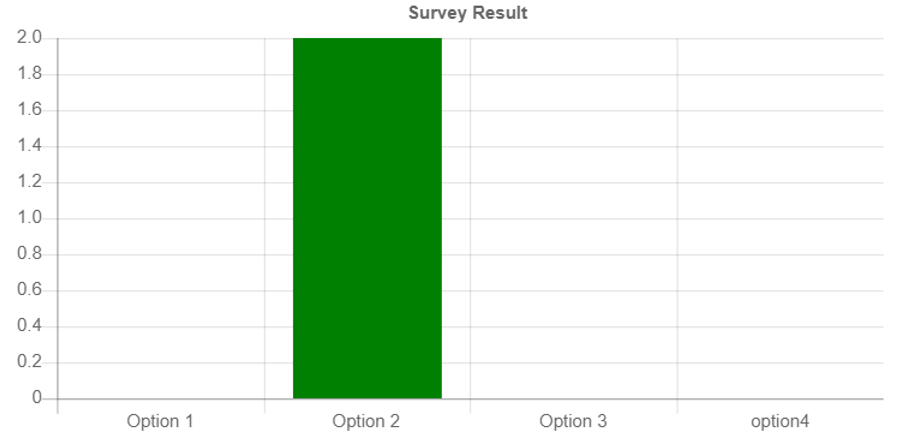
4. Last page of admin section, show the result of a particular question/survey in form of graph.
Step 1 – create a html file and html body should be empty.
Step 2 – style the page with CSS styles of your choice, don’t forget to link the CSS file in html head tag if you are creating separate CSS file.
Step 3 - create & link a javascript file which will be having create a graph functionality.
Step 4 – Go to the Official documentation of JCharts and pick the snippet to create a Bar Graph –
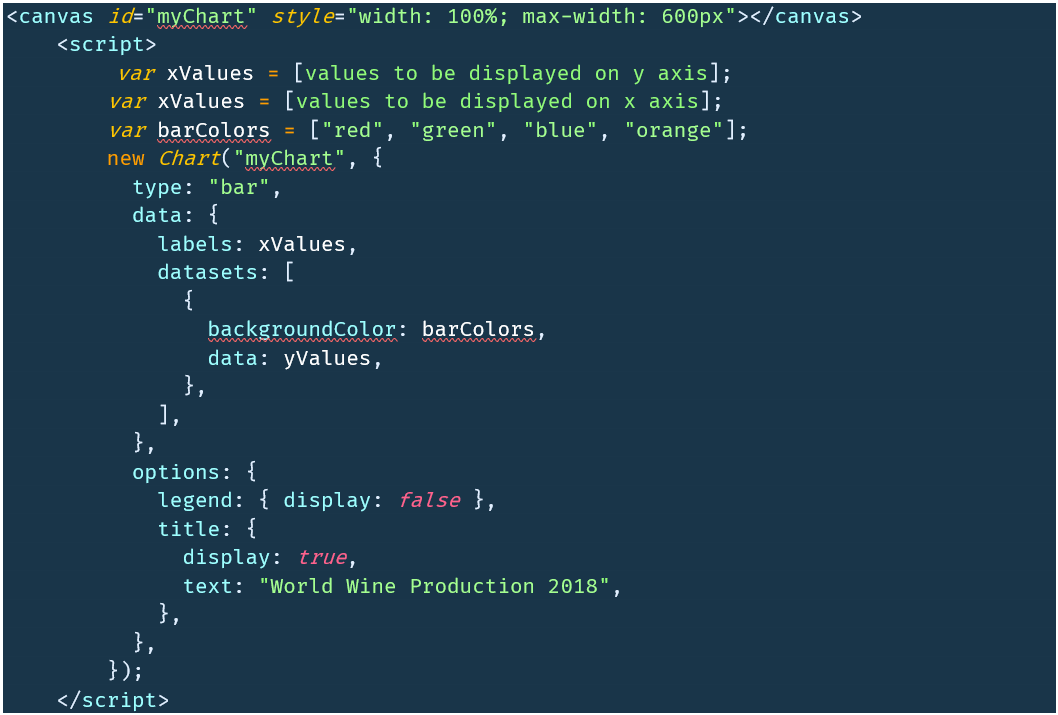
And mention the JCharts script link in script:src tag in head tag of html
Step 5 – The xValues array will contain Option 1, Option2, Option 3, Option 4 and the yValues will be retrieved from the local storage because we have stored an array in local storage so that we can use it in this page.
var yValues = JSON.parse(localStorage.getItem("yValues"));
we have to use JSON.parse because while storing it we used JSON.stringify so that we can get the array as it is after parsing.
Sample Output –