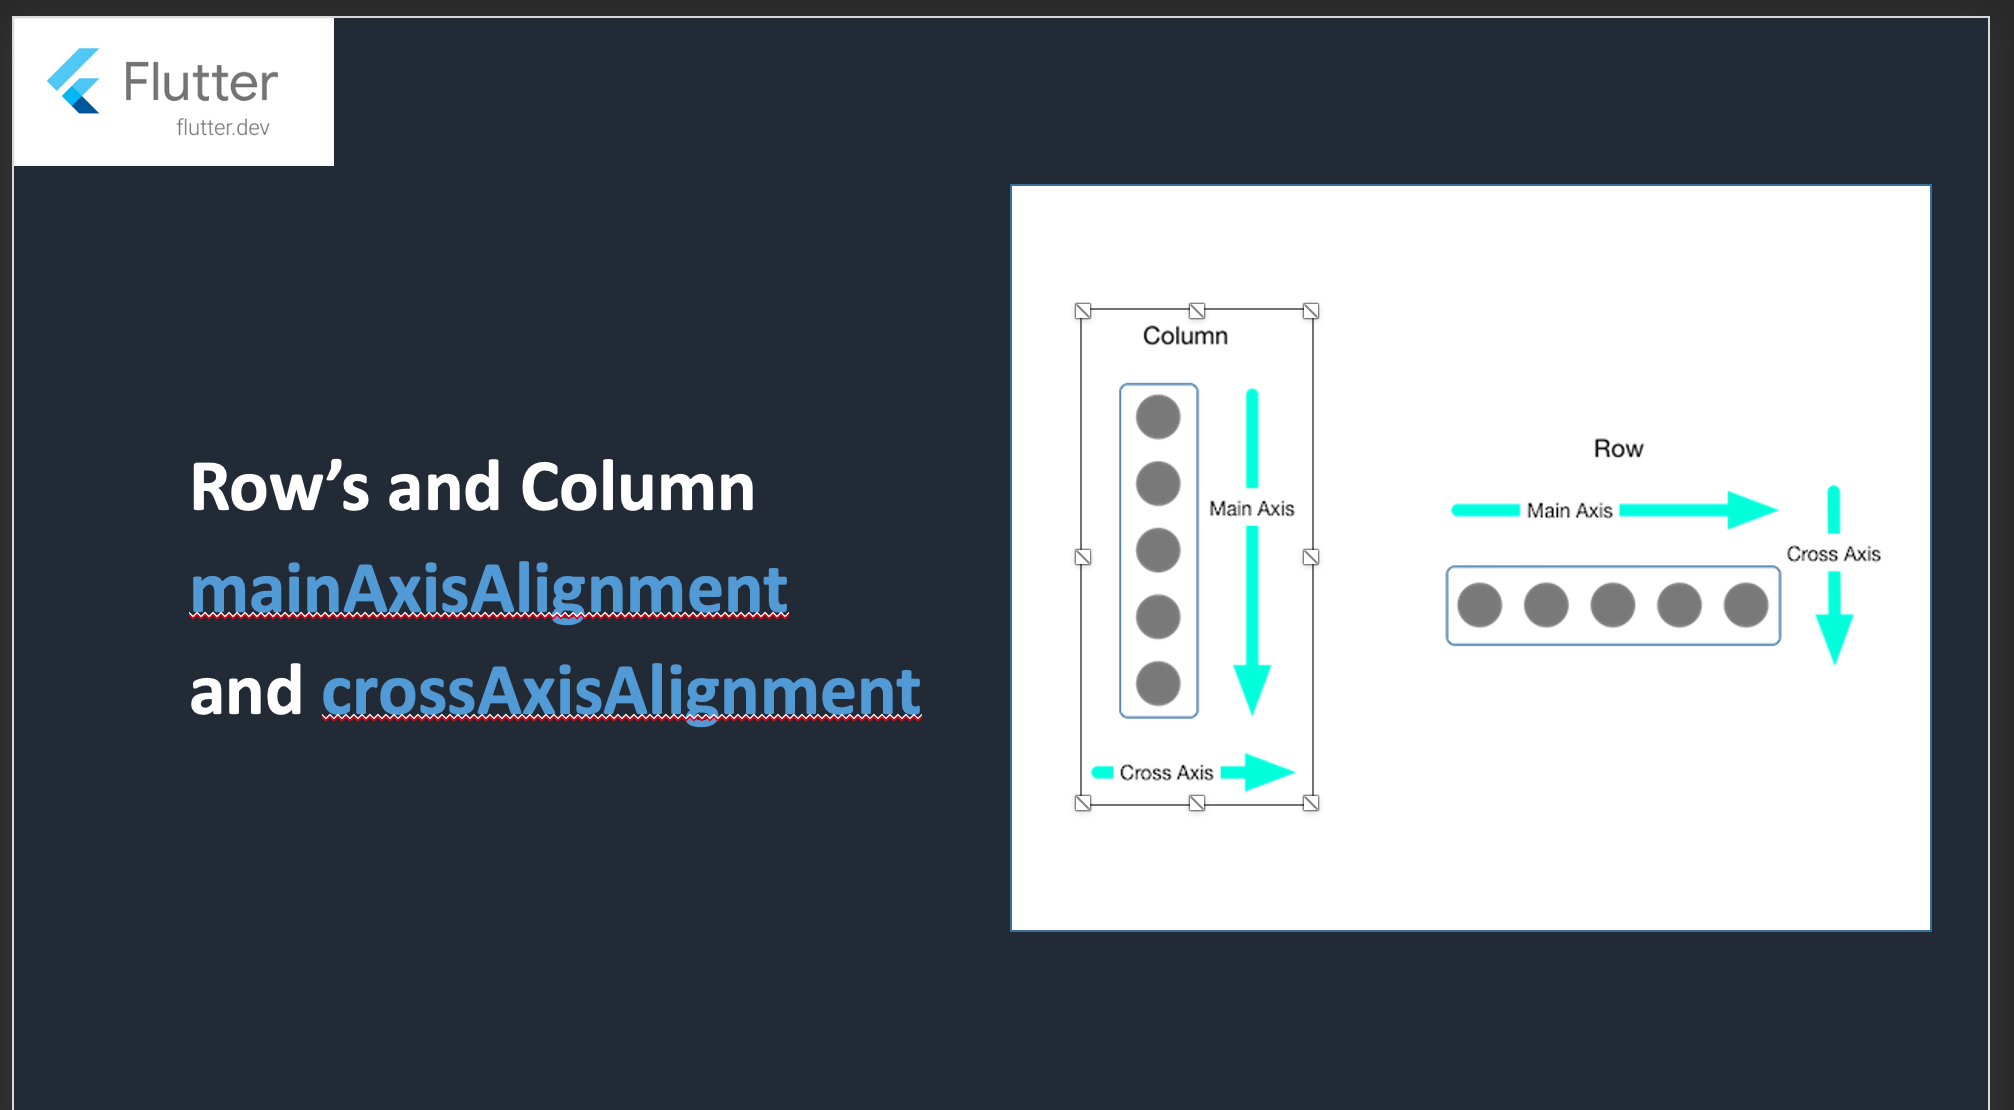
Row and Column Layout
A Row is a widget used to display child widgets in a horizontal manner. The Row widget does not scroll.
crossAxisAlignment and mainAxisAlignment
MainAxisAlignment.spaceEvenly- Place the free space evenly between the children as well as before and after the first and last child.
MainAxisAlignment.spaceBetween - Place the free space evenly between the children.
Row(
  mainAxisAlignment: MainAxisAlignment.center,
  crossAxisAlignment: CrossAxisAlignment.start,
  children: <Widget>[
    _getContainer(Colors.redAccent),
    _getContainer(Colors.amberAccent),
    _getIcon(Icons.play_circle_filled)
    //_getContainer(Colors.tealAccent)
  ],
)
//MainAxisSize.min
//Minimize the amount of free space along the main axis

Container(
  color: Colors.blueGrey,
  child: Row(
    mainAxisAlignment: MainAxisAlignment.center,
     mainAxisSize: MainAxisSize.min,
    //crossAxisAlignment: CrossAxisAlignment.baseline,
    //textBaseline: TextBaseline.ideographic,
    //crossAxisAlignment: CrossAxisAlignment.start,
    //verticalDirection: VerticalDirection.down,
    //textDirection: TextDirection.rtl,
    children: <Widget>[
      _getContainer(Colors.redAccent),
      _getContainer(Colors.amberAccent),
      _getIcon(Icons.play_circle_filled)
//CrossAxisAlignment baseline
Row(
crossAxisAlignment: CrossAxisAlignment.baseline,
textBaseline: TextBaseline.alphabetic,
children: <Widget>[
Text('Hello',
style: TextStyle(fontSize: 30, color: Colors.redAccent)),
Text(
'Hi',
style: TextStyle(fontSize: 20, color: Colors.teal),
)
],
),
What is the difference between alphabetic and ideographic in Flutter's TextBaseline ?
TextBaseline.alphabetic
The alphabetic baseline is the line that the letters in alphabets like English sit on. Here is an example:

You can see that the English letters sit nicely on the line, but it cuts through the Chinese characters.
TextBaseline.ideographic
When you use the ideographic option, though, the baseline is at the bottom of the text area. Note that the Chinese characters don't actually sit right on the line. Rather, the line is at the very bottom of the text line.

textDirection: TextDirection.rtl, // ltr
/*VerticalDirection Property
Determines the order to lay children out vertically and how to interpret start and end in the vertical direction.*/
Row(
  //crossAxisAlignment: CrossAxisAlignment.baseline,
  //textBaseline: TextBaseline.ideographic,
  crossAxisAlignment: CrossAxisAlignment.start,
  verticalDirection: VerticalDirection.up,
  //textDirection: TextDirection.rtl,
  children: <Widget>[
    Text('Hello',
        style: TextStyle(fontSize: 30, color: Colors.redAccent)),
    Text(
      'Hi',
      style: TextStyle(fontSize: 20, color: Colors.teal),
    )
  ],
),

Or
crossAxisAlignment: CrossAxisAlignment.end,
verticalDirection: VerticalDirection.up,

Packing widgets
By default, a row or column occupies as much space along its main axis as possible, but if you want to pack the children closely together, set its mainAxisSize to MainAxisSize.min.
Row(
mainAxisSize: MainAxisSize.min,
children: [
Icon(Icons.star, color: Colors.green[500]),
Icon(Icons.star, color: Colors.green[500]),
Icon(Icons.star, color: Colors.green[500]),
Icon(Icons.star, color: Colors.black),
Icon(Icons.star, color: Colors.black),
],
)
Sizing widgets
When a layout is too large to fit a device, a yellow and black striped pattern appears along the affected edge. Here is an example of a row that is too wide.
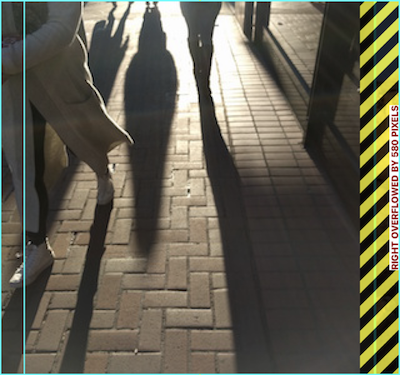
Row(
  crossAxisAlignment: CrossAxisAlignment.center,
  children: [
    Expanded(
      child: Image.asset('images/pic1.jpg'),
    ),
    Expanded(
      child: Image.asset('images/pic2.jpg'),
    ),
    Expanded(
      child: Image.asset('images/pic3.jpg'),
    ),
  ],
);

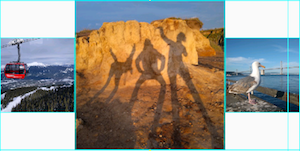
Row(
  crossAxisAlignment: CrossAxisAlignment.center,
  children: [
    Expanded(
      child: Image.asset('images/pic1.jpg'),
    ),
    Expanded(
      flex: 2,
      child: Image.asset('images/pic2.jpg'),
    ),
    Expanded(
      child: Image.asset('images/pic3.jpg'),
    ),
  ],
);
Stack Layout - Using a Stack you can position widgets over one another.
Stack
Stack
Use Stack to arrange widgets on top of a base widget—often an image. The widgets can completely or partially overlap the base widget.
Summary (Stack)
- Use for widgets that overlap another widget
- The first widget in the list of children is the base widget; subsequent children are overlaid on top of that base widget
- A Stack’s content can’t scroll
Widget _buildStack() => Stack(
    alignment: const Alignment(0.6, 0.6),
    children: [
      CircleAvatar(
        backgroundImage: AssetImage('images/pic.jpg'),
        radius: 100,
      ),
      Container(
        decoration: BoxDecoration(
          color: Colors.black45,
        ),
        child: Text(
          'Mia B',
          style: TextStyle(
            fontSize: 20,
            fontWeight: FontWeight.bold,
            color: Colors.white,
          ),
        ),
      ),
    ],
  );
fit: It will control the size of non-positioned children widgets in the stack. It has three types: loose, expand and passthrough. The loose used to set the child widget small, the expand attribute makes the child widget as large as possible, and the passthrough set the child widget depending on its parent widget.
SafeArea(
child: Container(
color: Colors.redAccent,
width: 400,
height: 400,
child: Container(
margin: EdgeInsets.only(top: 15),
width: 300,
height: 300,
//constraints: BoxConstraints.expand(height: 60),
color: Colors.amberAccent,
child: Stack(
fit: StackFit.loose, //expand,
children:
Container(
color: Colors.blueAccent,
child: Text(
"Loose StackFit",
style: TextStyle(color: Colors.white, fontSize: 18),
),
)
],
),
),
),
),
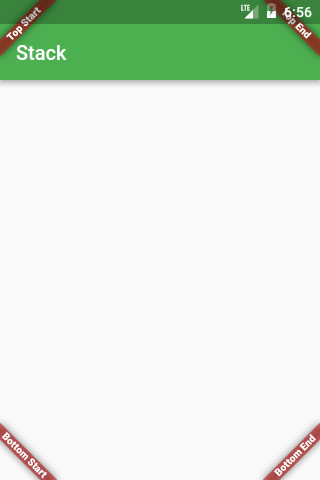
@override
Widget build(BuildContext context) {
  Widget main = Scaffold(
    appBar: AppBar(title: Text('Stack')),
  );

  return Stack(
    fit: StackFit.expand,
    children: <Widget>[
      main,
      Banner(
        message: "Top Start",
        location: BannerLocation.topStart,
      ),
      Banner(
        message: "Top End",
        location: BannerLocation.topEnd,
      ),
      Banner(
        message: "Bottom Start",
        location: BannerLocation.bottomStart,
      ),
      Banner(
        message: "Bottom End",
        location: BannerLocation.bottomEnd,
      ),
    ],
  );
}
That's all Folks