Welcome, to a simple, easy-to-understand blog on implementing multiple stacks in a single array. Whether you are a budding computer scientist or someone curious about data structures, this blog post will break down the concept of implementing k stacks in an array with easy-to-follow examples and step-by-step diagrams.
Understanding the Basics
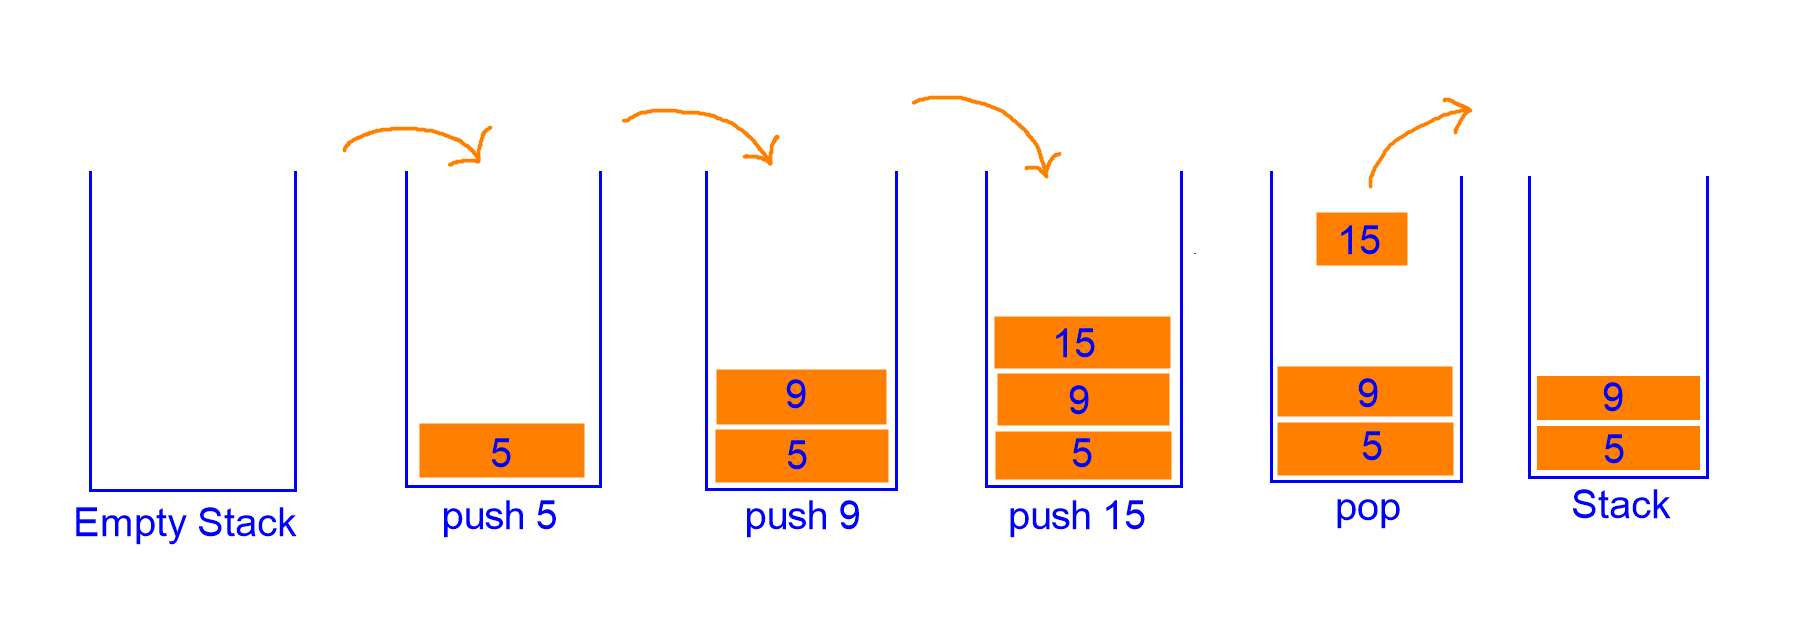
Before we dive into the implementation, let's quickly refresh our memory about stacks. A stack is a data structure that follows the Last In, First Out (LIFO) principle. Think of it as a collection of elements with two main operations: push (to add an element) and pop (to remove the top element).
Problem of the Day : Implementing K Stacks in an Array
I hope before coming to this problem you must have gone through the problem "How to implement 2 Stacks in an Array"
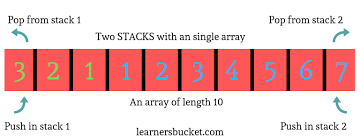
Certainly! Implementing two stacks in a single array involves dividing the array into two halves and managing separate pointers for each stack. For the first stack, use the first half of the array and initialize a pointer top1. For the second stack, use the second half and initialize a pointer top2. Push and pop operations can be performed by adjusting these pointers accordingly, allowing efficient management of two stacks within a single array.
Extending this concept, multiple stacks can be implemented in a similar manner.
Imagine you have a single array and you want to implement multiple stacks within it. How can you achieve this?
Problem Statement:
Given a static array of size n and the task to implement k stacks within it, each stack must operate independently and efficiently within its allocated section of the array. The array is divided into k equal parts, ensuring each stack does not exceed its allocated space. However, the current implementation poses a limitation: the stack may appear full even before the entire array is utilized. This inefficiency restricts the usage of available memory. To address this issue, it's necessary to move to a more optimized approach.
Solution Approach 2: Dynamic Sizing Array
To enhance the efficiency of the stack implementation, a dynamic sizing array approach is proposed. Instead of allocating fixed equal parts of the array to each stack, a dynamic resizing mechanism is employed. Each stack's capacity is adjusted based on its usage, allowing for better utilization of memory. When a stack reaches its current capacity, it can be dynamically resized to accommodate more elements. This ensures that the stack does not appear full prematurely, maximizing the use of available space.
In this approach, the stacks can grow and shrink dynamically based on the demand, optimizing the memory usage and allowing for a more flexible and efficient implementation. This dynamic sizing strategy not only resolves the issue of stacks appearing full before the array is empty but also provides a scalable solution that adapts to varying workloads and usage patterns.
Let's break down the approach step by step.
Step 1: Divide the Array
Firstly, divide the array into k segments, each representing a separate stack.

To keep track of the elements in each stack, you also need two additional arrays: one to store the top index of each stack (top[]) which will be of size "k"

and another to store the next available index in the main array (nextAvailableIndex).
Step 2: Initialize the Stacks
Set the initial values of top[] for all stacks to -1, indicating that the stacks are empty. Also, set the nextAvailableIndex to 0, indicating that the array is empty initially.

Step 3: Push Operation
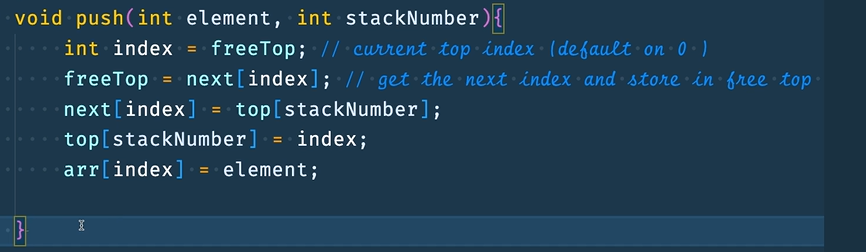
To push an element onto a specific stack, you need to find the appropriate segment in the array using the nextAvailableIndex. Update the nextAvailableIndex to the next available position in the main array. Update the top[] for the corresponding stack to the new element's index.
Step 4: Pop Operation
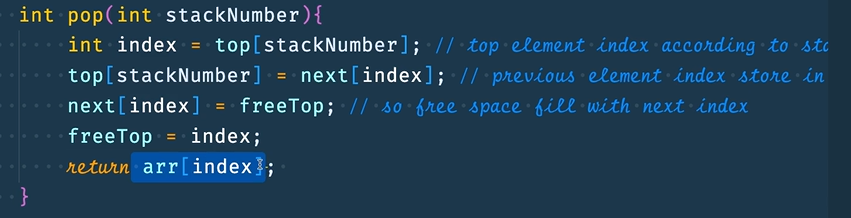
To pop an element from a specific stack, check if the stack is empty (by inspecting the top[]). If it's not empty, retrieve the element at the index indicated by top[]. Update the top[] to the index of the previous element in the stack.
Example
Let's consider a scenario with 3 stacks in a single array. Initially, the array is empty, so top[] = [-1, -1, -1] and nextAvailableIndex = 0.
Push 5 into Stack 1:
Update top[0] to 0 (index of 5 in the array).
Update nextAvailableIndex to 1.
Arrays after Push Operation:
top[] = [0, -1, -1]
array[] = [5, _, _, _, _]

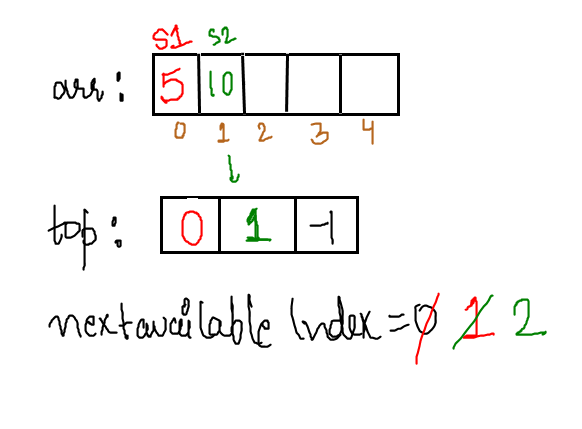
Push 10 into Stack 2:
Update top[1] to 1 (index of 10 in the array).
Update nextAvailableIndex to 2.
Arrays after Push Operation:
top[] = [0, 1, -1]
array[] = [5, 10, _, _, _]
Pop from Stack 1:
Retrieve the element at index 0 (top[0]) which is 5.
Update top[0] to -1 (indicating an empty stack).
Arrays after Pop Operation:
top[] = [-1, 1, -1]
array[] = [_, 10, _, _, _]

Push 7 into Stack 3:
Update top[2] to 2 (index of 7 in the array).
Update nextAvailableIndex to 3. Arrays after Push Operation:

Push 3 into Stack 1:
Update top[0] to 3 (index of 3 in the array).
Update nextAvailableIndex to 4. Arrays after Push Operation:

Pop from Stack 3:
Retrieve the element at index 2 (top[2]) which is 7.
Update top[2] to -1 (indicating an empty stack). Arrays after Pop Operation:

This process continues as you push and pop elements from the stacks, updating the top array and the main array accordingly.
Now, let's dive into the code for the flow we have discussed in the above example:
Step 1: Create a KStackClass with a constructor having an array of size n, another array "Top[]" of size k, and the next array of size of n again
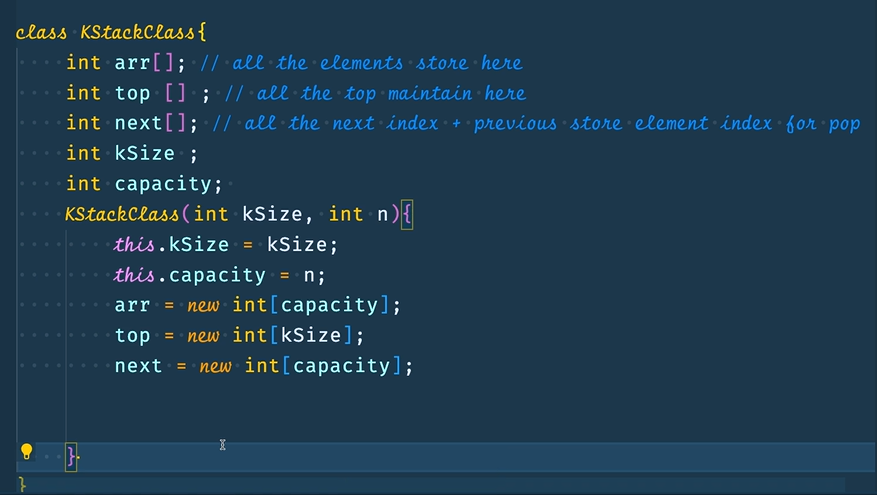
The KStackClass will be having some methods like topFill(), nextFill(), push() and pop().
Step 2 : Create a method topFill() , in which top[] array is initialised with -1

Step 2 : Similarly create a method nextFill() , in which next[] array is initialised with nextAvailableIndex
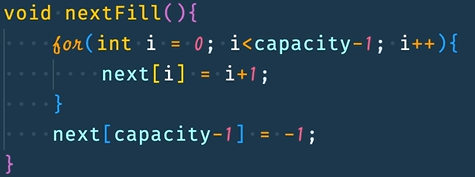
And initialise a freeTop

Step 3 : Create a push() method to store elements in the array accordingly to the stack number
Step 3 : Create a pop() method to remove elements from the array accordingly to the stack number
Once completing the KStackClass , let's move to the main method and try it
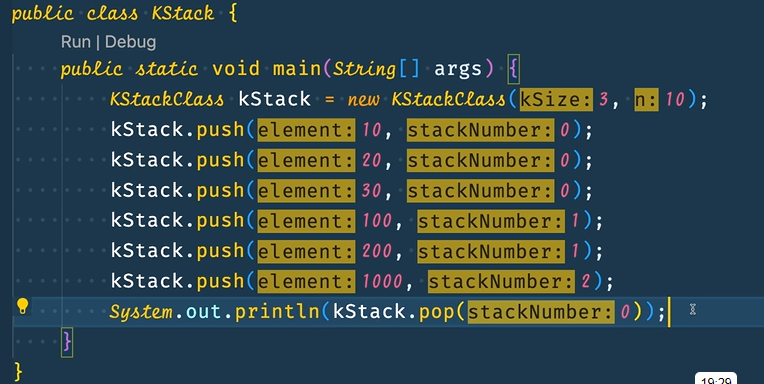
And u will be able to see the correct execution of the problem that is Implement K Stack in an Array.
So why wait to, start coding it guys💻
Conclusion
Implementing multiple stacks in a single array might sound complex at first, but by breaking it down into smaller steps and visualizing the process with diagrams, it becomes much simpler to understand. We hope this guide has shed light on this fundamental concept of data structures, making it easier for you to grasp the concept of implementing k stacks in an array. Happy coding!